With our new home I had some basic concerns around water quality, and the idea of “hard water.” Courtney, since moving from Cincinnati, has always complained that our water is hell on her hair. So I set out to learn as much about water quality, PH, things to watch out for and quite honestly it’s pretty terrifying if you get in to the weeds. For example, lots of conspiracy theories around fluoride in our water treatment processes that ultimately cause cancer. This was enough for me to consider investing in a top notch system for water, and food prep situations. So as usual I’m going to give you an idea of the equipment I purchased and try to hold to my tried and true consumer ecosystem of Costco and Amazon.
First, how I tried to assess my water condition. Identify PH level issues or contamination which also accounts for “hard water.” I leveraged two devices:


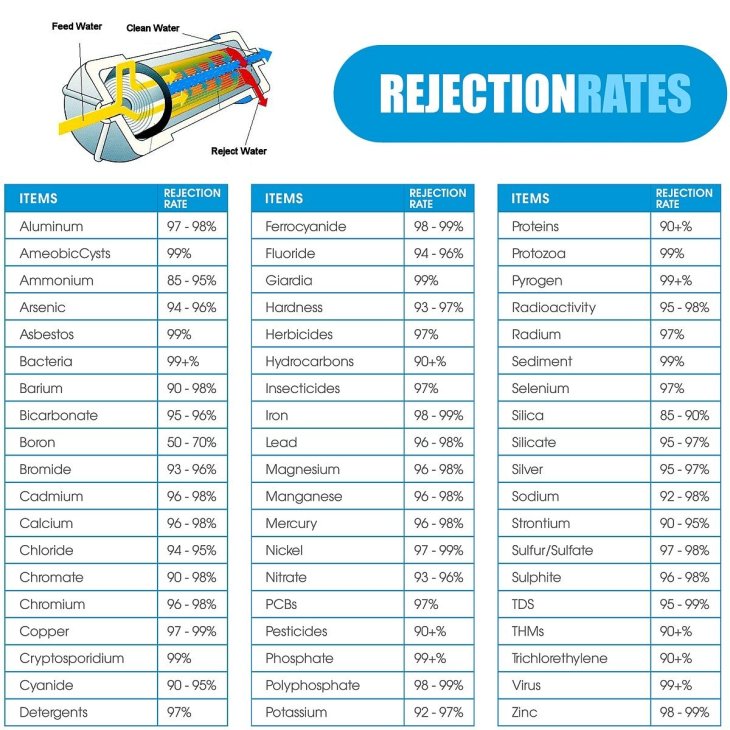
By using the combination of these I got my baseline:
- Cold Water 130-140 PPM
- Hot Water 180-200 PPM (This is because it goes thru the hot water tank


This set of pictures gives you an example of the range, and what is considered hard water in regards to PPM, what this measuring tool uses. We did not have hard water, but when you use hot water for showers, it’s pretty close!
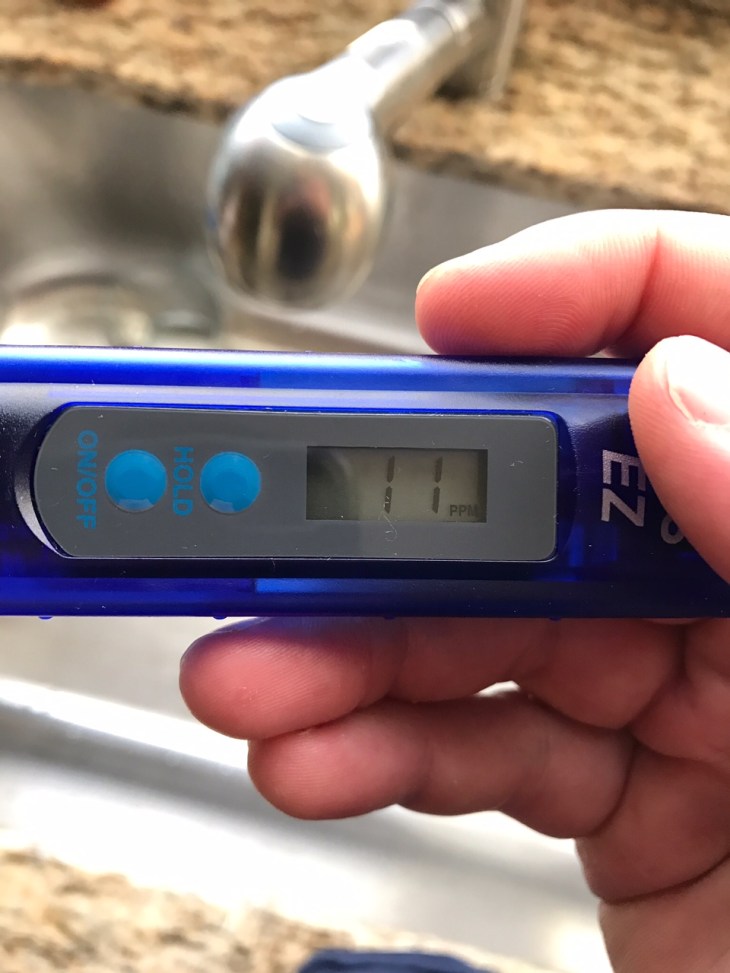
More on PH Later, but I did a variety of tests both using a powder and the meter. I recommend the digital meter – it was much more accurate in my case.


The 3 samples are cold, hot, and filtered (after the system was installed). But like I mentioned, more on that later because it gets more exciting and is why I chose the system below!
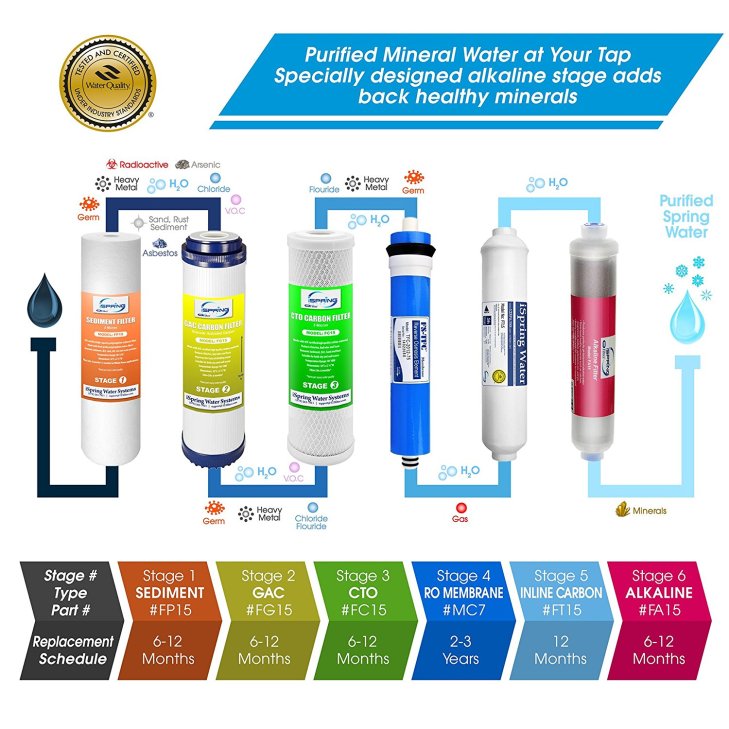
The system I actually decided on is a 6 stage filtration system, more popular only recently. To simplify why I picked this model: you extract all the bad stuff from the water with stages 1-5, and the final stage actually adds back the important minerals and help raise the PH level to the ideal for your body. Awesome right?!
For the visual learners – Check dis!
For the technical folks that are OCD :
After the system was installed and I got the digital tester I found that tap water was at 7.5 PH level and with this system it raised it to 9. I’ll let you google how expensive it can be to turn tap water into PH level 9 using crazy devices like electrolisis. Or you can just take my word for it and buy this. It definitely is on my “Must Buy Products” from research and personal experience. In addition, and for the record, my PPM count is lower than bottled water at this stage. Bottled water was around 21-23 from Kirkland and my tap water is down to less than 11!
Just to give you a bit more insight into the installation, it does take up quite a bit of space under your kitchen sink cabinet. Here are a few pictures and a reference diagram that you have to get in, too. I found the process pretty easy and maybe took an hour, but I have some experience working with plumbing.


One of the bigger items is the pressurized water tank, which I believe has an air bladder in it in addition to about 1.2-1.5 gallons of water. So you really don’t get in a situation where the flow is slow or you run out of water. Our home water pressure was no issue for the device. It does take an hour or so the first time you turn it on to fill up the tank, but it’s easy going from there.
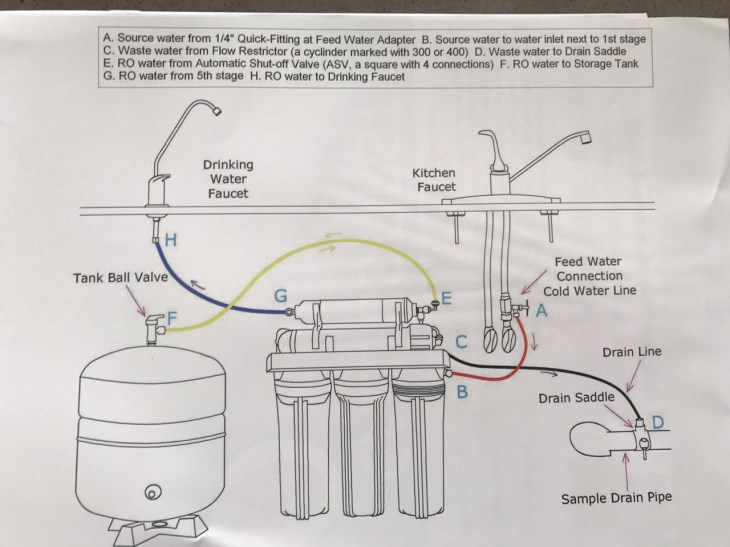
This is a reference diagram so you can really understand what your getting into. The directions were well written with tips along the way. The pipes used in the system are snap fit and super easy to work with if you follow the directions. For those of you not familiar with how these filtration systems work, it uses the water pressure from the exterior water line to “drive” and “power” the system. So in the process of cleaning the water you have “waste water.” It’s not much, it definitely wont raise your water bill. Let’s say for every clean gallon of water you drink, you flush 3 gallons back into the drain. So if you’re in an area where water is a luxury, or you’re more concerned about the environment than your body having cancer, this system may not be the best for you.
Here are a couple more tricks to help you along the way:
We have an exposed basement ceiling so I was able to run water lines to the fridge we have using this kit.
However. if you’re cheap and take this picture to Lowe’s, Menard’s, or Home Depot you can get the same stuff for perhaps half the price. Its not proprietary for the filter system. Just easy via Amazon! You’ll get an idea what things you need and how it works after you install the basic system. Just check out the plumbing section of a hardware store.

Honorable mention products I am using based on research:
– Courtney did not notice any difference with this filter in the shower. I see this product has great reviews so if you have “hard water” or crummy water in general this may help you. It did not make my “must buy” list because we noticed no difference. The vendor was very quick to respond to my questions as I went through testing PH levels (it does not filter out PPM). I still was unable to get any improvement with the tools I had available.

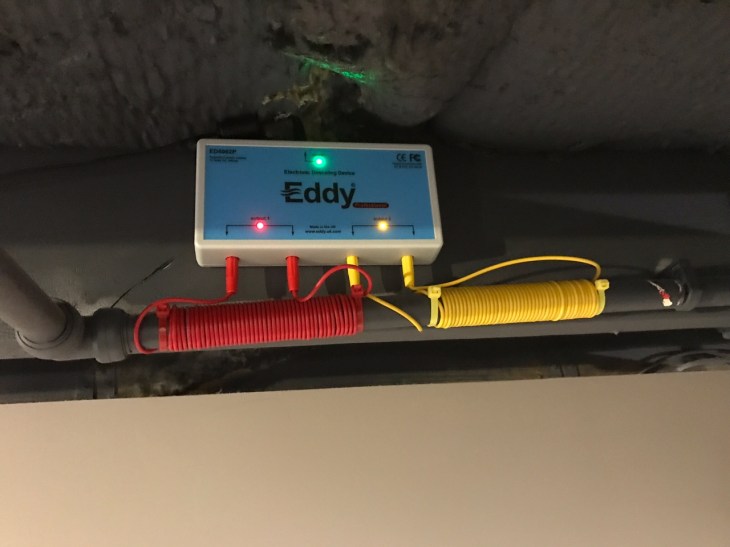
I also purchased this device:
In my mind this device is getting popular for houses that have”instant heat” devices instead of traditional hot water tanks. It uses magnets essentially to attract particles to itself, and not to you, or the walls of your shower for example. For people with instant heat hot water tanks, you don’t have to clean the units as often. I purchased this to eliminate “hard water” in our house without an expensive ($1500), high maintenance (salt), massive whole home water softener. This is another device unfortunately that could be snake oil and does not make my “must buy” product list. But for $200 I was comfortable with the investment and I had easy access in my basement to the inbound water line.