With our new home we were introduced to a refrigerator that has a lower slide out freezer compartment. I miss the "top" freezer model, now I have to bend down with my old man back to access my Graeters ice cream. I miss the good old days when all my tasty deserts were easily accessible and at eye level!
Recently we had a a leak that appeared to be at the freezer tray and water was pooling around the front lower legs of the unit. It was not a large volume, but it was enough to raise some concerns and catch my eye. I definitely wanted this address before installing new flooring.

Things I noticed upon further investigation:
- The freezer was maintaining its temperature.
- The freezer had previously been left open a small crack, which on more than one occasion caused a "Frost over" situation toward the front. Where items had a layer of ice/frost on them (Likely the ultimate culprit)
- The bottom of the drawer had filled with a 1/8" of water and frozen solid. This was actually very hard to notice or see because the pull out tray blocked it. But that gave me the impression enough water had filled up that little "lip" and was now leaking out. I was able to pound on it and break up the ice and throw it out (it was a lot).
What I realized with some research on the interwebs was that the freezers are designed to drain water as part of the cooling process. If the drain plug gets blocked, you are left with the situation I have. This can be due to the plug being covered with sticky residue (not my issue) or because the drain is blocked by ice (which was my problem). Normally the small amounts of water drain through a tube in the back of the unit and in to a tray hidden in the bottom, outside of the freezer and evaporate at room temperature.
Below is the back of my model so you can see some basics. Learn something new all the time!

I also found out that my model had a replacement part available to fix this particular issue because it was very common and a known "defect" with the model. If you had purchased you unit within a year or 2 they would ship you one for free. Our model was purchased in 2013, and I didnt move in the home until 2014 so I didnt even bother with a warranty claim and purchased it off amazon for $15.
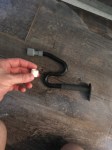
Before "Drain" plastic tube and after "P" trap drain tube.
So with a possible solution in hand, part order, and tools on hand. I figured I could easy McGuyver the freezer and fix this problem. This took about 30 minutes, most of which involved defrosting the blocked/frozen drain pipe. Make sure you turn your freezer compartment off, or disconnect your fridge all together before getting started.
First thing you'll need to empty out the freezer compartment, and remove the door so you can get to the back of the freezer compartment where the drain tube is.

The picture below shows you the anchor points the drawer connects to the door using 4 screws in my case. You only have to loosen them and pull the tray straight up. This will make reinstalling it later much easier.
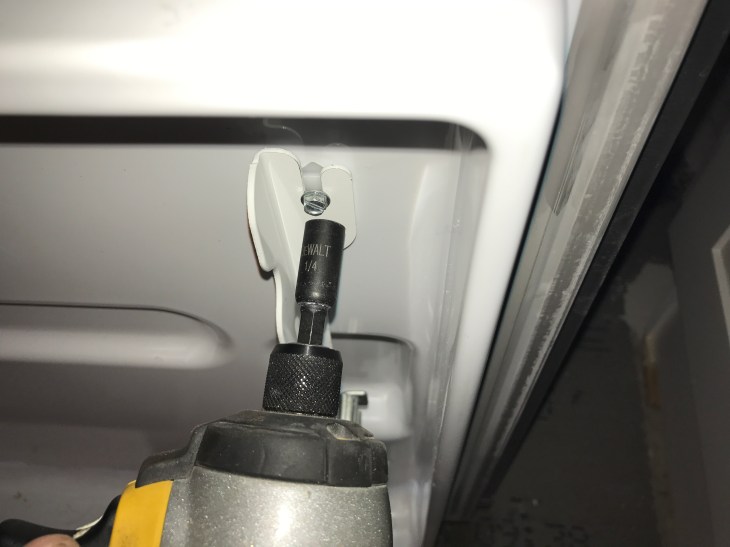

In addition the drawer can be removed by removing two additional screws one on each side that holds this frame together.

With everything removed you'll have a few additional components to pull off. The shroud that protects the fan blowing cool air and the temperature gauge on the left. Both of these clip in and with the aid of a flat head screw driver you can pop them out.
The picture below shows the clip. Hopefully this will enable you to easily remove these 2 parts without breaking the clip!

With those two things removed, you'll have one more (SHARP!) piece of sheet metal to remove, It has one or two small screws to remove then you can just bend and pull it out as one large piece.
The picture below shows all the fun components, when operating as designed cool your freezer! In the top right you can see a softball sized frozen mass of ice. That's the first sign you have a problem. In addition I've made a reference to the bottom middle where the drain tube is. Mine had about 1/2" of solid ice blocking it, so I couldn't even see it until I thawed everything out.

I am very impatient, so I decided in a controlled manner I would use a hair dryer to defrost all the frozen aspects and speed up the process. That way all my frozen goods wouldn't thaw out that were sitting on the counter. There is a limit to the amount of ice cream I can eat!

I defrosted from top to bottom, so that all the extra water would drain out the front in to a towel I had, instead of bottom up which would have allowed the water to drain down the drain pipe. That would have likely over flowed the small plastic tray in the back. But it in important to make sure everything is draining properly when your done so that you don't put everything back together and realize you still have an issue.
You may need to run some hot water thru the drain tube to clear out the ice. A fluid pump ( cheap one I use for cars ) or a turkey baster can help you access that tight spot where the drain tube is.
As part of this repair I replaced the drain tube in the rear of the unit. You'll need to unscrew a dozen sheet metal screws to access the compartment. Make sure your unit is turned off before swapping this out quickly.


The picture above has a red arrow that identifies a clip you'll need to press down on to remove the tube. Be careful or you can break the white plastic tray and be in a world of trouble.

Plastic Tube and rubber grommet removed.
New P Trap installed and mounted flush to the top. Not featured is that white spacer that also came with the P Trap. You'll put that on first which eliminates that rubber grommet that can get gunked up.
The new P Trap will clip in the same way as the old (below).
And again, another picture of the P Trap mounted flush to the unit to create an air tight seal.

Once everything is defrosted, the drain tube is clear and draining water properly. You can re-assemble everything and you should be good to go foreverrrrrr.
DIY for life,
Justin
